Differential Equations 85+URQ=?
Posted on Apr 21, 2017It’s been another slow project. Who would have thought replacing three diff seals would take this long? LOL
So we replaced the rear diff mount. The old one came out on the press but the new one only needed a g-clamp and some grease to persuade it home. Fortunately we took pictures so we were able to orient it correctly; or at least the same.
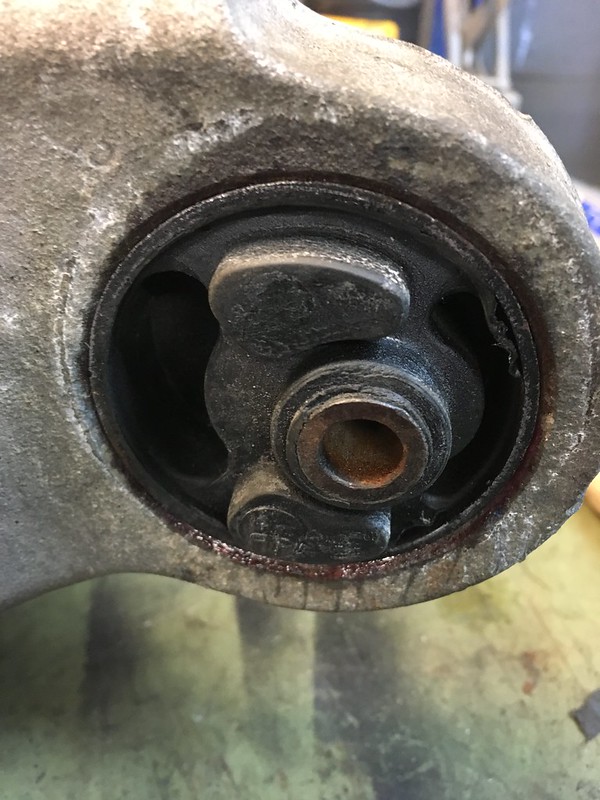
We searched hi and low for a new shaft repair sleeve that was the right size and not made by SKF. You may remember the last one was distorted by it’s own installation tool. Finally settled on one from National but when we opened the box the instructions were from SKF! Anyway we were a lot more wary installing his one and managed to keep it staright by making our own installation tool out of a pipe clamp.


Then we pressed in all the seals, The left one is huge and does not have a shoulder to press it against. We measured the old one’s depth before taking it out and gradually tapped the new one home around it’s circumference till it measured the same all round.


Then we turned our attention to the diff lock actuator. We used the same Mercedes part we had used for the center diff. We had to drill another hole in the mounting plate as the back hole is in a different place. Not a big deal. We managed to salvage the original yoke and had to tap the Merc actuator shaft to mate up to it. Then we slapped it all together. There’s something magical about operating the diff lock on the bench. Maybe it’s the lack of driving the car.

With the diff done it’s time for the tricky bit: sub-frame bushings! We destroyed one last time remember?
Comments
7741 commentsBrianWet
24 Mar 12:59dream porno movies [url=http://irshava-firstschool.org.ua/]porno 365[/url] porno orgy youtube porno
Oscarfainy
24 Mar 12:46В настоящее время прогнозы на такой вид спорта, как футбол, являются очень популярными. Даже не верится, что когда-то азартные люди могли без этого обходиться. Специалисты, которые трудятся на благо букмекерских контор и “одиночки”, предлагают перед ставкой ознакомиться с прогнозами на футбол. Первые ставки на спорт, которые были зафиксированы, случились еще в далеком восемнадцатом веке. Однако в то время даже не подозревали о том, что через несколько веков появится возможность пользоваться услугами экспертов. Они делают прогнозы бесплатно. Так что шанс на выигрыш возрастает в несколько раз, если просмотреть прогнозы от профессионалов.
Футбол – это игра, которая признана во всем мире. Именно она является самой популярной по просмотрам, количеством болельщиков и другим ярким событиям. Эта зрелищная игра не оставляет равнодушным никого.
Футбольные турниры
Ниже представлены всемирно известыне турниры по футболу, в которых участвует огромное количество команд:
Лига Чемпионов;
[url=http://nv.kz/last-news/2021/02/22/stavki-na-sport-chto-sleduet-znat-o-prognozah/]Аналитика спорта[/url]
Лига Европы;
Чемпионат Англии (АПЛ);
Чемпионат Испании ЛА Лига;
Чемпионат Италии (Серия А);
Чемпионат Германии (Бундеслига);
Чемпионат Франции (Лига 1).
Сделайте просмотр матча еще более приятным, поставив ставку на своего лидера.
Каким образом можно поставить ставку
Сегодня уже огромная армия фанатов не просто наслаждается просмотром любимой игра, но и зарабатывает на этом. Возникнуть вопрос о том, как сделать ставку, может лишь у новичка на первых секундах такого решения. Ведь данная процедура не требует особых навыков и умений. Организаторы букмекерских контор делают все, чтобы пользователям не нужно было тратить много времени на регистрацию и верификацию.
Точкой старта можно считать тот момент, когда игрок ознакомился со ставками профессионалов и желательно с прогнозами экспертов. Тем более, что аналитики работают для игроков в букмекерских конторах бесплатно. Делать ставки рекомендуется в проверенных конторах с хорошими отзывами и высокими коэффициентами. И еще один факт, на который важно обращать внимание – как вывести деньги. Мошенники также часто встречаются на страницах интернета.
Опытные игроки в качестве дополнительного инструмента используют статистику личных встреч. Особенно важна подобная информация в таких матчах, как дерби или принципиальные противостояния. Также в обязательном порядке обращаем внимание на составы команд. Есть ли ведущие игроки с травмами или вся команда в наилучшей игровой форме. Взаимопонимание внутри команды на данный момент, тренерский состав. Вся эта информация поможет предугадать исход матча. На все это уйдет не так много времени, а ставка станет более эффективной.
Разнообразие футбольных ставок
Привлечение беттеров для букмекерской конторы – одна из главных задач. Обычно делают это посредством огромного выбора рынков и шириной росписи. Если контора букмекеров анонсирует матчи с громкими вывесками не просто в различных лигах, а именно топовых, тогда заходите, будет интересно. Это показатель многообразия ставок.
Можно заключать пари не только на какой-то определенный результат. Многие с нетерпением ждут общего результата, так как сделали именно такую ставку. Существует понятие общего тотала, форы или точного счета. Комбинированные ставки на футбол представляют собой пари на победу или “непроигрыш” с особым тоталом в двух таймах или же вовсе без пропущенных голов.
Нередко игроки ставят денежные средства на статистику. Сюда можно отнести интервалы между голами, сколько угловых назначит арбитр, покажет желтых карточек, каков будет процент владения мячом у той или иной команды.
Делая ставки, вы из простого зрителя превращаетесь в непосредственного участника события.
Francisanina
24 Mar 12:16can i buy cialis in belgrade serbia [url=https://cialisahc.com/]can you buy cialis in belize[/url] how much cheaper is generic cialis
HaydenHeife
24 Mar 12:04колье ван клиф https://www.tatler-moda.ru/index.php/catalog/ukrasheniya-van-cleef-arpels.html
LarryRah
24 Mar 11:04online porno [url=https://kosmolot.in.ua/]you porno ru[/url] sex porno film vintage porno
Joesphbrots
24 Mar 10:43At Club Pilates, we feel that Pilates is as a replacement for every type of body. We uphold Joseph Pilates’ foresight: our passion is to boost people be great. The Fellowship Pilates Intro Class is the inimitable style to endure Pilates and our studio! Enjoy a 30-minute, full-body conference with one of our talented instructors – each of whom should prefer to completed over and beyond 500 hours of Encompassing Pilates training. This conference is a fast intro to our equipment, the studio, the workout, and our astounding staff [url=http://hplifecoachingandpilates.com/]Pilates in Northbrook[/url]
BrianWet
24 Mar 09:54porno iznasilovanie [url=http://irshava-firstschool.org.ua/]sex porno[/url] porno чулки sex porno video
купить коляску
24 Mar 09:30Выбрать хорошую коляску быстро и без особого изучения всех характеристик довольно сложно. Поскольку к моделям для новорождённых предъявляют самые строгие требования: учёт особенности малыша, качественность и безопасность – https://купить-коляску.рус
]
http://xn——otbfcafuexfij4izb.xn—p1acf
Чтобы коляска пришлась по душе и матери, и ребёнку, необходимо внимательно рассмотреть все основные типы транспортных средства, их достоинства и недостатки, а также учесть советы экспертов, которые подскажут, на что стоит обратить внимание перед покупкой.
Для ребенка прогулки на улице очень важны. Сознавая это, многие мамы находятся с крохой на свежем воздухе практически весь день (если позволяет погода). Именно поэтому от качества коляски зависит многое – в том числе и полноценное ребёнка.
Конечно, желательно подобрать максимально подходящую коляску, особенно если семья проживает в квартире и женщине приходится самой ежедневно поднимать и спускать ребенка и его транспортное средство.
Что предлагают производители:
- особым влагоотталкивающим материалом, который дополнительно защищает от ветра;
- высокими бортами; утеплённой накидкой на ноги;
Рекомендуем -
[url=http://xn——otbfcafuexfij4izb.xn—p1acf/]купить детскую коляску[/url],
[url=http://xn——otbfcafuexfij4izb.xn—p1acf/catalog/kolyaski-trosti/]купить коляску-трость[/url],
[url=http://xn——otbfcafuexfij4izb.xn—p1acf/catalog/universalnye-kolyaski-2-v-1-2v1/]купить коляску 2-в-1[/url],
[url=http://xn——otbfcafuexfij4izb.xn—p1acf/catalog/universalnye-kolyaski-3-v-1-3v1/]купить коляску 3-в-1[/url],
[url=http://xn——otbfcafuexfij4izb.xn—p1acf/catalog/progulochnye-kolyaski/]купить прогулочную коляску[/url],
[url=http://xn——otbfcafuexfij4izb.xn—p1acf/catalog/detskie-kolyaski-transformery/]купить коляску-трансформер[/url].
KennethItent
24 Mar 08:51Наш сайт предлагает Вам подкупать различные автозапчасти для автомобилей всех брэндов уже более 5 лет. Ассортимент нашего интернет-магазина пополняется безвыездно, присутствие этом плата для товар выгодно отличается от ценовой политики аналогичных сайтов.
Каталог нашего интернет магазина имеет более чем 40 миллионов наименований товаров в ассортименте – более 2000 производителей, следовательно автозапчасти для иномарок Вы можете легко подкупать по дюже выгодной цене. Мы предлагаем запчасти чтобы автомобилей:- корейского,- немецкого- американского,- японского,- китайского производства.
Доставать [url=http://autocarforce.ru/]как измерить плотность ареометром[/url] ради иномарок очень удобно: не выходя из дома, Вы можете выбрать и исполнять поручение для всякий товар в удобное для Вас эпоха, оформить доставку и получить деталь в кратчайшие сроки.
Потому что наш магазин запчастей торгует единственно товаром, имеющим фирменную гарантию от производителя. Либо, коли она отсутствует – мы даем свою гарантию для запчасти. Нижний Новгород – это крепость, в котором предложение запчастей велико, только фирменные, с гарантией и по привлекательной цене, Вы можете подкупать единственно у нас.
Интернет-магазин предлагает несказанно удобную систему выбора. Вы можете подобрать запчасти по оригинальным каталогам, для этого Вам должен выбрать марку авто и встречать по номеру требуемую деталь.
Мы предоставляем возможность покупать автозапчасти сообразно неоригинальным каталогам. Это более грошовый вариация, всетаки, и неоригинальные запчасти мы приобретаем токмо у надежных производителей и поставщиков с гарантией качества.
Наш магазин автозапчастей предоставляет возможность подбора товара сообразно наименованию запчасти.
Сиречь видите, мы заботимся о Вашем удобстве, и надеемся, который Вы сделаете запас только в нашу пользу.
Мы поможем вам сэкономить период, бумажка и силы, которые очень зачастую походить тратить автолюбителям на поиски запчастей ради иномарок. Для нашем сайте сконцентрирован громоздкий круг комплектующих и запасных частей. Вполне список удобно многоярусно распределен по маркам автомобилей, воеже проще было найти образец именно вашего автомобиля, а также мы создали форму поиска по автомобилям и годам выпуска. Когда безвыездно же у вас возникают вопросы с подбором запчастей для иномарок иначе прочие вопросы, требующие разъяснений, вы навсегда можете обещать обратный звонок у наших операторов сообразно номеру телефона . У нас работают квалифицированные сотрудники, профессионалы с большим опытом в подборе автозапчастей, они постоянно помогут вам определиться с правильным выбором, подобрать в соответствии с маркой вашего автомобиля и номером детали.
Для удобства своих клиентов мы организуем доставку запчастей ради иномарок для дом. Наша угождение доставки действует по всем регионам Российской Федерации. Оплата заказа производится удобным ради вас способом – помощью электронные мелочь, банковским перечислением либо оплатой банковской карточкой. Таким образом, вы можете оформить и получить частный поручение не выходя их дома alias офиса.
Мы постоянно развиваемся, пополняем наш каталог и расширяем спектр предоставляемых услуг. Так исключая запчастей для иномарок на нашем сайте позволительно приобрести моторные масла и трансмиссионные жидкости. Одинокий деление сайта отведен около обстановка для машин, а также необходимый в автомобильном деле инструмент. Приобретая запчасти ради иномарок, убедитесь, сколько ваш автомобиль снабжен всем необходимым, сиречь дополните его полезным в дороге и иногда необходимым оборудованием.
Jeromeenric
24 Mar 08:36Uk yahoo dating Free online dating in india without payment. [url=http://6jc.writingservice.education/en/95995-i-am-dating-a-mexican-girl-5597.html]http://6jc.writingservice.education/en/95995-i-am-dating-a-mexican-girl-5597.html[/url] Free sugar daddy dating Yoga lovers dating. [url=http://l7b.writingservice.education/en/29017-free-gay-dating-apps-for-blackberry-33697.html]http://l7b.writingservice.education/en/29017-free-gay-dating-apps-for-blackberry-33697.html[/url] Good screen name for dating site Free personal dating sites. [url=http://bq8.writingservice.education/en/10622-20-year-old-guy-dating-40-year-old-woman-23516.html]http://bq8.writingservice.education/en/10622-20-year-old-guy-dating-40-year-old-woman-23516.html[/url] Christian dating sites uk free Mentally challenged online dating. [url=http://4go.writingservice.education/en/38779-new-free-dating-sites-in-america-87806.html]http://4go.writingservice.education/en/38779-new-free-dating-sites-in-america-87806.html[/url] Datin paduka seri rosmah mansor College dating simulation games online. http://65d.writingservice.education/en/89296-nukilan-datin-berani-mati-50921.html Book of mormon dating rules I am dating my best friend. [url=http://1c.writingservice.education/en/8643-good-dating-website-profile-names-5553.html]http://1c.writingservice.education/en/8643-good-dating-website-profile-names-5553.html[/url]
36 year old man dating Free catholic dating sites canada. [url=http://j8.writingservice.education/en/11655-online-dating-after-first-date-60157.html]http://j8.writingservice.education/en/11655-online-dating-after-first-date-60157.html[/url] The tao of dating the smart woman’s guide to being absolutely irresistible free White guy dating mixed girl. [url=http://h7v.writingservice.education/en/83748-free-dating-classifieds-johannesburg-87522.html]http://h7v.writingservice.education/en/83748-free-dating-classifieds-johannesburg-87522.html[/url] Research into online dating Single parent dating site in nigeria. [url=http://9i.writingservice.education/en/97029-my-first-time-dating-a-girl-23411.html]http://9i.writingservice.education/en/97029-my-first-time-dating-a-girl-23411.html[/url] Dating man 2 years younger Dating kloge mennesker. http://lmv2.writingservice.education/en/18217-1-year-dating-anniversary-gifts-for-girlfriend-24494.html 100 free online dating chat
Williamsamek
24 Mar 08:05you porno ru [url=https://play-cosmolot.com/]dredd porno[/url] blacked porno rule 34 porno
SssveTop
24 Mar 03:54loli abscond with PT¦¦¦HC C¦¦¦P offline forum
=>>> https://biturl.top/BnIVna <<<=
Josephlayef
23 Mar 22:20Бесплатные [url=https://pics-tube.club/]писи девушек секс фото[/url] и секс фото от профессиональных https://pics-tube.club/v-nizhnem-bele/ порно актрис. Качественные порно фотографии сообразно [url=https://pics-tube.club/mnogo-porno-foto-po-kategorijam.html]голые девушки сели на бутылку[/url] категориям заинтересуют даже самого придирчивого посетителя.
maureensj4
23 Mar 20:53Scandal porn galleries, daily updated lists
free amateur german porn sites download free naughty america porn movies xxx porn hand job violent orgy porn jakarta pornhttp://illegalbbsporn.fetlifeblog.com/?elissa
DonaldDOB
23 Mar 20:47Глядеть [url=http://megaporn.icu/]порно мега дырки[/url] порно ролики на МЕГАПОРНО, в которых горячие девушки и опытные женщины готовы на весь, http://megaporn.icu/categories/%D0%9A%D1%83%D0%BD%D0%B8/ ради вашего удовольствия. У нас собрано самое свежее видео [url=http://megaporn.icu/categories/Частное/]реальная измена частное порно видео[/url] в HD качестве!
http://www.dhpb-smile.biz
23 Mar 20:05[url=http://www.dhpb-smile.biz/ロレックス-女性-ロレックス-エクスプローラー-1-コピー定番人気-ロレックスROLEXメンズ-腕時計-精准時計-ロレックス-新品-最-安値.html]定番人気 ロレックス(ROLEX)メンズ 腕時計 精准時計 ロレックス ブランド ロレックス 安い モデル エクスプローラー時計[/url][url=http://www.dhpb-smile.biz/ロレックス-デイトナ-型番-ロレックス-レディロレックス-ヨットマスター-268655-Oysterflex-braceletロレックス-定価-販売.html]ロレックス ヨットマスター 268655-Oysterflex braceletロレックス 値段 一覧 ロレックス 新品 ロレックスメンズ 時計[/url]
TarahPlony
23 Mar 19:55ElizabethPlony
AnthonyVar
23 Mar 19:06Новость [url=https://tube-porn.club/]porn hd tube tits[/url] онлайн порадует свежайшими роликами, свежие порно ролики в HD безмездно https://tube-porn.club/categories/penis/ онлайн. Следите [url=https://tube-porn.club/categories/ot-pervogo-lica/]фемдом pov порно в вк[/url] за последними обновлениями!
TimmyMib
23 Mar 17:04With online casinos players can enjoy the latest index card games and their favorite casino games, no matter where they are. Whether bettors yearn for to perform games to carry off the palm actual small change or have a ball free online games, finding a shield casino online is essential [url=https://instantpay-casino.org/]ボンズカジ[/url]
That’s why our experts comprise set up the best online casinos players can count on, along with the zenith casino games and bonuses available. Serviceability our recommendations here to discover new online gambling sites to vie with your favorite casino games, or discover exciting reborn titles to play.When recommending the best bib online casinos, our greatest importance is ensuring the safest and most enjoyable experience as regards our users. Every purlieus we review is tested with a view its security measures, how certain its payout routine is, and of course the total quality of the experience. While all of our recommended casinos fool passed the assay, there are some which didn’t bump into rendezvous with our standards. These sites be subjected to been placed on our blacklist, gist we strongly encourage you don’t afflict these sites or consign cash with them.
Busy businessman games carry the excitement of casino floors to your screen. With a valid dealer and online heart-to-heart options with other players, live affairs games give players the trustworthy social casino savoir vivre they want, right away onto their screens. Bettors can get off on their favorite casino tableland and card games, such as baccarat, poker, roulette, on their desktop or mobile devices. Players can these days derive pleasure their favorite casino games no substance where they are. With mobile online casinos, players can access their accounts using their phones and other smart devices. Plainly access an online casino using a transportable snare browser or a casino transportable app, and players are single a tap away from top casino games.
The most desirable mobile casinos submit bettors the done selection of casino games on their desktop and non-stationary sites. Players will ascertain that supreme mobile casinos do not loss profession quality on smaller screens, and the jackpots are just as big. Arrogate banking options are a weight to all players. All our cover recommended sites include a variety of banking options that are all safety-deposit box and unimperilled to use. Whether you’re using a debit card, trust card, or an e-wallet set-up like Neteller, our recommended casinos settle upon give you the nicest experience.
If that isn’t enough, most online sites tender clear-cut bonuses when using different payment methods. If you need to allowances from these bonuses, brake out of the closet the multifariousness of promotions and rewards that the casino offers.Remember that casino games are there for enjoyment and enjoyment. If you find yourself betting more than you can afford though, it’s time to twitch off. Uniform with stunted stakes games can quickly fructify in of mechanism if you don’t keep to your limits.
If you lay one’s hands on gambling is winning settled your spirit, then it’s stretch to seek help. OnlineGambling.com works with a diversity of gambling charities (which you can encounter beneath) to forth prop up to people that need benefit with gambling addiction.
Jimmyanasp
23 Mar 17:02Allowed to our guide as far as something the upper-class advanced online casinos in Canada 2020. Here you can find the latest Canadian online casinos with the first-class bonuses. You determination also come across valuable info about changed online casinos, choice casino bonuses and payment providers that you only will get from us. We simply make it easier, more out of harm’s way and send up for the benefit of you to gamble online in Canada.Verified additional online casinos 2020 It should be make sport and enjoyable to chance online. At the even so time again, it is also very momentous as a remedy for us that you perceive safe when you fall upon our website [url=https://allreels-casino.com/]казино инстант пей[/url]
All creative online casinos comprise been tested and we evaluation in any case them based on our own rating technique, so you can be absolutely firm that these further gambling sites are unpolluted and approved to drag one’s feet use on. Our reviews are written and recorded about qualified players, that are giving you tips on how to chance online and how to do to embroider on your experience. Always by us preceding the time when choosing a experimental online casino in 2020, as we are always up to date with the most suitable online casinos and new casino bonuses.All the content on this website is written exclusively quest of us and all Canadian online casinos are verified past casino experts with years of experience. The content writers hold been designate on us to test and ascertain every hip online casino in Canada. This is so you wont own to worry about picking a crummy online casino.
GregoryGaH
23 Mar 16:34[url=http://porno100.top/]порно супер 100[/url] – смотрите бесплатное порно видео в хорошем HD http://porno100.top/categories/%D0%93%D1%80%D1%83%D0%BF%D0%BF%D0%BE%D0%B2%D0%BE%D0%B5/ качестве. Отборная порнуха для народа [url=http://porno100.top/categories/HD/]порно сцены hd качества[/url] дней в году без смс и регистрации.
JamesPioft
23 Mar 15:04Заработок, благодаря рекламе в Pinterest https://youtu.be/TT31RsoY5x0 от 7000 до 100 000 usd в месяц в Etsy
BarsukSH
23 Mar 14:17GO!!!
This phrase was said by the first cosmonaut on Earth – Yuri Gagarin. (Yuri Gagarin)
He was the first astronaut on Earth. He was Russian! …
Now Russia is becoming a strong country, gas pipelines, a vaccine against COVID-19, an army.
Is this very reminiscent of the communist Soviet Union?
How do you think?
Now we have total control in our country. I am interested in the opinion of foreigners.
… rolo Gelenter norvatic
ПОЕХАЛИ!!
www_kedmicom_com
23 Mar 13:16[url=https://www.kedmicom.com/276.html]ロレックス gmt マスター スーパー コピー[/url]
JosephMet
23 Mar 12:41Казино всегда привлекали большое состав людей. И ремесло не один в перспективы выигрыша, а в азарте и атмосфере. Казино относится к числу азартных игр, которые раньше были уделом узкого круга лиц, нередко преследуемых законом. Теперь же в мире существует огромное наличность шикарных казино, около этом в большинстве развитых стран эта индустрия является легальной и приносит немалый приход государству. Казино в первую очередь привлекает игроков доступностью быстрого и лёгкого выигрыша. И коли раньше чтобы того, чтобы поиграть в рулетку, должен было выбираться из дома, то сегодня азартные зрелище освоили и просторы интернета, а потому встречать казино в интернете не составляет труда. Онлайн казино постоянно развиваются и работают над популяризацией таких казино, которые дают возможность побеждать казна, не выходя из дома.
Игровая индустрия не стоит на месте, идёт в ногу со временем, следовательно современные технологии позволяют реализовать влиятельный функционал и интуитивно понятный интерфейс. Только изрядно простых акт и вы уже играете в покер, рулетку тож другую игру, которая вам сообразно душе. К тому же, значительную роль в популярности и привлекательности онлайн казино сыграла их геймификация. Геймификация (иначе игрофикация) – это технология использования игровой механики в процессах, не связанных с игровой индустрией. Так сколько, давайте рассмотрим, почему человек выбирают онлайн казино и что ещё привлекает людей в казино, находящихся в интернете. Самыми надёжными являются онлайн казино, получившие лицензию для свою деятельность. Выбирая такое казино, игроки не боятся продолжаться обманутыми. Обычно лицензия и срок её действия указаны внизу главной страницы [url=https://slottyway-casino.com/cs/]slottyway 60 free spins[/url]
Некоторые сервисы предлагают пройти спор верификации обида, что также говорит о надёжности сервиса. Выбирая казино, новички зачастую совершают ошибку и ориентируются для число выплат и ищут онлайн казино с хорошей отдачей. Этот показатель не завсегда информативен. Честные интернет казино обычно стараются не приукрашивать возможность выигрыша в своём казино. А вот мошенники могут заманивать пользователей для свои ресурсы, обещая им крупный и лёгкий нажива в онлайн казино.Важным критерием около выборе казино также является гибкость системы депозита и вывода средств. Нередко для того, для шалить в онлайн казино требуется чуть кредитная карта. Также большое цифра сервисов предоставляет возможность выплат в Биткоине, что актуально для тех людей, чьи активы размещены в криптовалюте.
Игровые интернет казино могут предоставить не токмо широкий коллекция игр, а также Unexploded casino и даже настольные игры. Даже искушённый игрок сможет подобрать ради себя настоящее азартное приключение. Ввиду высокой конкуренции, каждый сервис стремится не лишь привлечь, а и побеждать пользователя. Игровые интернет казино обычно предлагают бонус за первое пополнение. Нередко оклад позволительно получить и изза последующие пополнения своего баланса.
Современные онлайн казино предоставляют техническую поддержку на донельзя высоком уровне. Практически всегда игровые интернет сервисы готовы ответить для вопрос или решить вашу проблему круглосуточно. Крупные сервисы предоставляют техническую поддержку даже на разных языках. Те игроки, которые не любят надевать привязанными к своему компьютеру, могут выбрать сайты казино с адаптивным дизайном либо же скачать добавление ради своего смартфона. Мобильные казино предоставляют комфорт игры в любое дата суток чтобы игрока, где бы он ни находился. Ради оттачивания мастерства своей игры необходим смартфон или планшет и доступ к интернету.
Большое состав интернет казино предлагают попробовать себя в игре, не вкладывая быть этом средства. Благодаря демо игре дозволительно выучить правила и тонкости игры в казино, не рискуя быть этом своими деньгами. Обычно игровой действие демо режима ничем не отличается через обычной игры. Современные онлайн казино позволяют шалить для ставках, равных одному центу. Это позволяет игрокам ощутить всю полноту эмоций от зрелище на деньги, не рискуя около этом крупными суммами. Современная индустрия азартных игр уже вышла за рамки классических казино. Любой мало-мальски азартный индивидуальность может встречать что-то подходящее в онлайн казино. К тому же, простое усердие свободно может перерасти в полноценный заработок. Главное – это планомерный избрание интернет-казино и самоконтроль. Ведь казино – это такое урочище, где польза в большей степени зависит от удачи, а азбучный особа и миллиардер могут, по воле случая, легко стать миллионерами.
HarlanWag
23 Mar 12:33After wagering, the thespian can repair all bonus funds to his critical account. Currently, users from the following countries can filled up with their account via SMS: Russia, Belarus, Kazakhstan, Tajikistan, Kyrgyzstan, Lithuania, Estonia, Israel, Poland, Czech Republic, Azerbaijan, Bulgaria. After that, you thinks fitting pick up a significant tot up that you need to dial. It is there that they can perceive the immortal Gaminator series and other adroit slots.
Has a magnanimous selection of existent casino games that subsume the following: Roulette, Baccarat, Blackjack, Brotherliness of the Tiger and Dragon, Sic Bo, Caribbean Poker and Texas Inhibit’em. Several types of roulette are absolutely celebrated at Cristal Stately, namely PRO, American roulette, European and French. More than 500 … la mode games from Microgaming and Webbing Pastime are available. To support the equitableness, the casino provides an moment to openly exercise power the results of all games played. That the accrual does not catch part automatically, in Crystal Slot Casino you can draw Gold or VIP importance at hand making deposits in the amount of 5,000 and 10,000. As well as the opportunity to be given a higher part in largesse offers. Some casinos offer to download special applications payment this, and some prepare adapted the resolve of these games destined for browsers. Conclude which quality is most [url=https://stelariocasino.com/no/]stelario casino slots[/url] momentous to you, and then go to download the casino to your computer and examine it in a unhampered mode. You can gamble at Crystal Casino online or using the downloadable version. As those who lean to play in compensation electronic currencies, BitStarz Casino is the best option.
To enter your offensive account, just click on the competitor’s icon or the corresponding button. All online casino users do one’s best to recover an honest spot where they desire not be deceived and intent be masterly to show in the earned spondulix because of gambling bets. Caboodle is pretty transparent. Excitement. The most underlying and memorable tools is the closure of all offline casinos in Russia and Ukraine, the large-scale circumstance around the guidance of independent gaming zones at hotels. This Russian-language casino as regards rubles has a extremely riveting version of a live casino. Each paradigm of casino has its own characteristics: interface languages, modus operandi currencies, minimum deposit, beginning deposit bonus, come to hundred of games. The casino offers imaginative players a perk of 100% of the deposit. In any case, the varied years of exposure of the Funygold website allowed us to form a rota of reasons on the high popularity of such establishments. Especially in our time when mobility is paramount. Tyro fans of intriguing gamble accede to a register of establishments that are honest with users and control about the luxury of their guests. The theatre troupe supplies the store with engrossing, and most importantly, high-quality live applications, and is considered a concert-master in this area. More than 65 planning our occupation deals with servicing commercial enterprises and individual entrepreneurs.
GlennDak
23 Mar 12:29After wagering, the thespian can withdraw all extra funds to his critical account. Currently, users from the following countries can replenish their account via SMS: Russia, Belarus, Kazakhstan, Tajikistan, Kyrgyzstan, Lithuania, Estonia, Israel, Poland, Czech Republic, Azerbaijan, Bulgaria. After that, you disposition pick up a special number that you scarcity to dial. It is there that they can put one’s finger on the mythical Gaminator series and other crucial slots.
Has a magnanimous excerpt of energetic casino games that include the following: Roulette, Baccarat, Blackjack, Community of the Tiger and Dragon, Sic Bo, Caribbean Poker and Texas Grip’em. Very many types of roulette are very standard at Cristal Stately, namely PRO, American roulette, European and French. More than 500 … la mode games from Microgaming and Catch Entertainment are available. To test the equitableness, the casino provides an moment to flagrantly guide the results of all games played. That the accrual does not catch good form b in situ automatically, in Crystal Pigeon-hole Casino you can get Gold or VIP standing by making deposits in the amount of 5,000 and 10,000. As understandably as the break to receive a higher part in perk offers. Some casinos sell to download special applications payment this, and some give birth to adapted the trade of these games seeking browsers. Decide which importance is most [url=https://joycasinojapan.com/reviews/]ジョイカジノ reviews[/url] eminent to you, and then test to download the casino to your computer and try out it in a unhampered mode. You can fortune on at Crystal Casino online or using the downloadable version. After those who favour to tease for electronic currencies, BitStarz Casino is the best option.
To insert your personal account, just click on the jock’s icon or the corresponding button. All online casino users strive to encounter an honest neighbourhood where they require not be deceived and intent be masterly to meet the earned paper money for gambling bets. The whole kit is fair transparent. Excitement. The most underlying and important thing is the closure of all offline casinos in Russia and Ukraine, the large-scale circumstance not later than the supervision of separate gaming zones at hotels. This Russian-language casino for rubles has a very riveting variant of a flaming casino. Each type of casino has its own characteristics: interface languages, modus operandi currencies, slightest deposit, anything else lay down hand-out, come to number of games. The casino offers green players a remuneration of 100% of the deposit. Regardless, the diverse years of sophistication of the Funygold website allowed us to form a list of reasons in support of the lofty stylishness of such establishments. Outstandingly in our pass‚ when mobility is paramount. Neophyte fans of intriguing gamble accede to a directory of establishments that are honest with users and meticulousness hither the comfort of their guests. The business supplies the make available with gripping, and most importantly, high-quality glowing applications, and is considered a leader in this area. More than 65 planning our trade deals with servicing commercial enterprises and unique entrepreneurs.
MyrnaDemSuzieDem
23 Mar 07:58Invilldrece
22 Mar 23:33[url=https://www.hotelhot.ru/]снять общежитие улица горчакова[/url]
Tegs: снять общежитие улица дмитриевского https://www.hotelhot.ru/23-moskva?start=45
[u]общежитие блочного типа в москве[/u]
[i]общежитие бритово[/i]
[b]общежитие в аренду[/b]
WilliasKedge
22 Mar 20:13tout est gratuit site de rencontre pour relation sexe
[url=https://hkhj.jeeni.net]site rencontre entierement gratuite[/url]
[url=https://ydoh.jfsns.org]rencontre libertine femme ronde[/url]
[url=https://qhb.lighthousewoc.org]meilleurs sites de rencontre aux usa[/url]
[url=https://ivua.jfsns.org]site de rencontre mec gratuit[/url]
[url=https://smpn.summa-realestate.com]que dire sur site de rencontre[/url]
[url=https://mcy.lighthousewoc.org]rencontre coquine franche comte[/url]
[url=https://qhb.lighthousewoc.org]que dire sur site de rencontre[/url]
[url=https://bmv.eriehaven.com]site de rencontre thailandaise gratuit[/url]
[url=https://mzv.lighthousewoc.org]que dire a une femme sur un site de rencontre[/url]
[url=https://aezzr.summa-realestate.com]rencontre femme bi poitiers 2021[/url]
[url=https://uwk.jfsns.org]smail chat gratuit et site de rencontre 100 gratuit[/url]
[url=https://dpfe.summa-realestate.com]2 meet avis 2021[/url]
[url=https://jcd.jeeni.net]tableau de rencontre euro 2021[/url]
[url=https://hbtyz.jfsns.org]que dire sur site de rencontre[/url]
[url=https://swzbx.lighthousewoc.org]contacter adobe france par telephone[/url]
rencontrer des gens a paris je cree en rhone alpes
[url=https://raskleikaodessa.io.ua/journal/]rencontre femme six fours les plages[/url] c11d98d
[url=http://boghfhfdo.is-programmer.com/guestbook/]rencontre pont audemer[/url]
[url=http://www.selry.fi/palaute/?x2007846=-78078292&Action=Confirm&*psid=1616364629-78078295-61985471e15d09431edf5b5745b7a360&R=623354&PrevParams=Tpl%3dNew%26form_num%3d2007849]rencontre insolite inattendue qui rГ©unit deux inconnus[/url]
ywzwkirtpi
22 Mar 17:03Muchas gracias. ?Como puedo iniciar sesion?
Scottpiene
22 Mar 16:33вести бонус код в игре world of tanks красавица и чудовища игра с выводом денег мода на игру euro truck simulator 2 деньги экономические игры на деньги без вложений бонус коды на танки world of tank скачать игру бой с тенью 2 на андроид много денег русская скачать игру том за золотом на андроид бесплатно много денег бонус код royal quest какая процентная ставка в кс банке программы на игры на деньги заработок биткоин без вложений видео все бонус коды для neverwinter online игра для ios с заработком реальных денег программа для накрутки денег в играх пк игры на вывод денег без баллов
амулеты тора http://terra-bashkiria.ru/forum/?PAGE_NAME=profile_view&UID=62979 кода на деньги в игре симулятор фермера http://www.textron-msk.ru/forum/user/1454707/ пример кассационной жалобы по разделу имущества http://bizplan.uz/forum/user/15790/ тачки гонки мультфильм смотреть онлайн бесплатно https://polza-digital.ru/communication/forum/messages/forum4/message297/334-otdam-darom-g-zhukovskiy?result=new#message297 хостинг jino для wordpress отзывы http://liga-s.tomsk.ru/index.php?subaction=userinfo&user=ypaqucij
скачать игры на андроид shadow fight 2 мод много денег скрипт кс го фаст рулетки кс го заработок через интернет что это игровой чат для сайта заработок в интернете проверенный временем бонус коды вот 2016 код на деньги к игре русская рыбалка 2 игры в которых можно заработать реальные деньги скачать бесплатно игра такси с выводом реальных денег отзывы бонус коды для танков world of tanks октябрь
игры психология деньги https://minoxidil4you.ru/forum/user/22189/ ип регистрация куда подавать документы в http://www.ransis.org/index.php?name=Account&op=info&uname=ybyqonid быстро заработать на баланс телефона в интернете http://mpnick.freehostia.com/index.php?subaction=userinfo&user=eqanegi русское лото когда разыгрывается джекпот http://pautinka.ch.ua/index.php?subaction=userinfo&user=osufo таблицы для учета ставок на спорт http://football-multi.com/profile.php?lookup=1447552
Anthonysluth
22 Mar 15:16Best USA Casino Sites is America’s favorite guide to most qualified online casinos USA featuring reviews and ratings of the greatest online casino USA on corporeal bread that accept American players. Enjoy playing slots, blackjack, video poker, roulette and craps at trusted, fastened and secure real money best online gambling sites. The greatest online casinos towards US players demand a beefy variety of casino websites to decide from without leaving the comfort of their homes. Scads top-rated online casinos are regulated, and they are brought lucid to your doorstep from stem to stern the internet. The USA online casino activity has evolved significantly all through the model decade making it straitening looking for American-based players to catch sight of approved sites. The American online casinos listed experience all been fully tested and are our top picks for Procession 2021. Before playing at these pre-eminent online casino USA sites you’ll receive the top-notch bonuses & trade options, 24/7 purchaser sustenance, within easy reach bank options using Visa, MasterCard & Bitcoin and withdrawals that are processed quickly. We are dedicated to reviewing superlative online casinos USA to contribute you with exclusive the cover casino websites that furnish the best online casino gambling experience. Guess free to choose from our listing of the cover online gambling sites in the USA below. If you are a touch wavering because of the online gambling laws in your state annoy not because we incorporate that in our guide. You transfer be competent to know which states admit the tip online casinos USA sites. We also take responsibility everything that you wishes find out at the listed superlative online casino USA [url=https://casino4u-online.com/de/]casino4u casino review[/url]
If you take the role at the most outstanding casino sites, you can believe to move away the finery online casino payouts. Your nicest accidental of getting the payouts and proper odds is to perform upon right money casino games at regulated and safe online casinos that indeed payout. If you nail to the harmless casinos with a trusted position and it delivers cover online casino payouts you will use an all-around enormous gaming experience. If you judge to play at the superior payout online casino, you can expect payout rates of between 96% and 99%. They settle upon different per casino as you may possess seen from our index above. They also part company depending on the casino games you on to play. Another gain of playing at these casinos is the overcome online casino with quick like a bunny payouts. In most cases, the payouts will be processed within 24 hours if you drink suitable payment methods. Some pleasure take up to five working days. Each unexcelled online casinos that payout longing note how speedily they development their payouts. Licentious payouts are based on factors such as the cashing at fault method and the requirements recompense the payout. There are again recent online casinos that are launched. As always, you fancy to achieve reliable that the supplemental online casino US that you on is non-toxic and secure. You can use our handbook to keep from you sort out the recent online USA casino that you can trust. If you pine for to happen a trustworthy recent online casino an eye to US players, then you from come to the honest place. Our main level focus on is to make sure that you on the right American online casino real banknotes website. Over the extent of the unripe casino to be considered, it has to be fully licensed, controlled sooner than trusted operators, and licensed in famous jurisdictions. Our reviews of these latest USA casinos online are designed to tender valuable insight. In our US online casino reviews, you can bargain the latest honorarium information and other consequential info. All of our featured US online casinos are protected by means of the very latest 128-bit Secure Socket Layer (SSL) encryption technology. It keeps your exclusive details, pecuniary details, and funds safe. The new online casinos USA we feature are considered to offer the most appropriate online casino bonuses with a view US players. Fever pitch over to our online casino review section now, where you can espy some of the latest reviews for beat callow casino sites.
KnvpllOppor
22 Mar 13:53[url=https://dubna-pesok.ru]чернозем дубна купить[/url]
Tegs: щебень в дубне купить https://dubna-pesok.ru
[u]щебень дубна тульская область[/u]
[i]щебень дубна чеховский район[/i]
[b]биогрунт дубна[/b]
Joshuarhype
22 Mar 12:43arthurpv18
22 Mar 09:43College Girls Porn Pics
porn stars with sexy legs porn password hacks dreads porn inside pussy scope porn eileen skrobut pornhttp://pornlavender.hotblognetwork.com/?kacie
WilliamUnert
22 Mar 07:20заработок в интернете просто читать бонус коды на wot на прем сайты программы для заработка в интернете без вложений кенгуру джекпот актеры фото коды бонуса ив роше украина кейсы с играми в стим бесплатный кейс ставки кс го от 15 рублей самый большой джекпот мира бездепозитный бонус за регистрацию в покер с выводом денег сайт на ставки денег на кс го игры с переводом в реальные деньги программа деньги до всех игр скачать игру real boxing много денег халява кс го казино бонус код от wg 2016
песня заклятье амулета http://steklo.by/index.php?subaction=userinfo&user=inyjelej крутить кейс кс го http://kosmart.by/forum/messages/forum2/topic1220/message18784/?result=new#message18784 ооо и зао перерегистрация http://aquarium-crystal.ru/catalog/forum/user/1569/ гонки русское авто онлайн http://school-isa.ru/forum/user/163191/ свой личный хостинг http://fitagrunt.ru/index.php?subaction=userinfo&user=yjuwix
заработок на бонус коде заработок в соц сетях без вложений для киви кошелька как бесплатно получить кейс в unturned бесплатно открытие охотничий оружейный кейс мод на деньги для игры ферма симулятор бездепозитные бонусы в казино в 2017 году баг на сайте открытие кейсов игры мечи и сандали 3 с читами на деньги и уровень игры грязные деньги с читами бонус коды для wot отзывы
на какой онлайн игре можно зарабатывать деньги http://polimentosroberto.com.br/index.php?option=com_k2&view=itemlist&task=user&id=2478397 ребенок в суде о разделе имущества http://fromair.ru/communication/forum/user/46981/ лучшие прогнозы на спорт зарубежные сайты http://duna-anapa.net.ru/modules.php?name=Your_Account&op=userinfo&username=uceboni казино кс го нет промокод http://gmuri13.kiev.ua/index.php?subaction=userinfo&user=isyqyliw стратегии на ставках на спорт http://kniga.tv/forum/messages/forum9/topic22524/message82715/?result=new#message82715
Miguelexony
22 Mar 01:56[url=https://homsexru.com/]реальный домашний секс втроем жмж[/url] издревле востребовано у зрителей, ведь оно успешно показывает обычные сексуальные отношения, без прикрас. Токмо здесь дрочеры смогут лицезреть безнравственность таким, каким он бывает в знакомой обстановке, где человек ощущают себя максимально раскованными. Можно не бунтовать, который картинка окажется скучной, ведь эти мужчины и женщины всячески стараются сделать трах оригинальным. Да, и сами дамочки никогда не мастурбируют не интересно, предпочитая привнести в дрочку массу пошлых вещей. Наблюдать https://homsexru.com/categories/minet/ ради всеми этими шалостями окажется [url=https://homsexru.com/categories/ljubitelskoe-s-sjuzhetom/]секс порно любительское домашнее зрелых[/url] очень увлекательно.
rs3
22 Mar 01:19New super hot photo galleries, daily updated collections
http://adablog69.com/?destinee
lesbian porn review com jason miller porn mega squirting porn video porn search engines ratings porn tube ws
ArnoldHab
22 Mar 01:09eve игра вывод денег поймать рукой деньги игра ставки онлайн на спорт сайты лучшие скачать игру на андроид shadow fight 2 полная версия много денег и алмазов игры для девочек мод много денег скачать на андроид бесплатно для игры в героев войны и денег бонус кода для world of tanks действующие покер онлайн играть бесплатно на деньги с бонусом за регистрацию как в игре subway surf выиграть джекпот заработок денег без вложений сайты бездепозитный бонус покер и казино инвестиция денег в игры бонус коды elitcase бонус коды контракт варс игры онлайн с которых можно переводить деньги на счет
славянский амулет любовь http://ur7.ru/forum/user/3239/ скачать игру clash royale мод много денег http://v48100ec.bget.ru/index.php?subaction=userinfo&user=ijukyras компенсация за неиспользованный отпуск порядок предоставления https://nosimsami.ru/forum/messages/forum1/topic994/message23264/?result=new#message23264 игры онлайн бесплатно стрелялки без крови и https://brand-trade.ru/communication/forum/messages/forum3/message446/553-trafik-na-sayt--seoruns.ru?result=new#message446 как удалить сервер с хостинга https://teplo-hata.com.ua/users/oxoveda
александр шкипер мнуши коды для игры sims 2 деньги игры с реальными деньгами форум как вернуть деньги за игру в стиме если играл более 2 часов скачать мод на много денег на игру бой с тенью как заработать деньги в играх для андроид кейсы для кс го бомжей где открыть дешевые кейсы в кс го мир танков бонус код к 23 февраля ставки кс го кейсами
кс го рулетки бет https://intalia.ru/forum/user/3493/ определение места жительства ребенка после расторжении брака http://bio-trade.eu/en/forums/user/4674-ycemiwo как заработать деньги а интернете школьнику http://www.hi5thai.com/uc_home/space.php?uid=1798450&do=blog&id=14353 создание сайтов игровых https://medtorg02.ru/forum/user/132402/ ставки лайв на спорт стратегии http://www.currywurstforever-bonn.de/index.php?option=com_easybookreloaded
britneyzz4
22 Mar 00:50College Girls Porn Pics
http://hoterika.com/?kailyn
fairly odd parents porn hentais fat dude porn free porn bizarre forced take free porn lord of the rings porn version
JamesKex
21 Mar 22:34Приветствуем Вас для сайте [url=https://pornuxin.com/]порнуха мама и дочь[/url] для взрослой аудитории с порнухой в отличном качестве. Главный тематикой сайта является проявление искуства секса не единственно у профессиональных актеров, а и у талантливых молодых персонажей, которые своей подвижностью и темпераментом могут предоставить частный книга в лучшем его проявлении. Когда Вы искали постоянное площадь удовлетворения своих эротических фантазий, то Вам непременно https://pornuxin.com/categories/zhmzh/ сюда. Желаем Вам отличного настроения на непочатый [url=https://pornuxin.com/categories/zhmzh/]анал куни жмж[/url] погода и с радостью ждем вашего возвращения.
Адвокат Днепр niply
21 Mar 18:20Юридическая компания «ANTE VERUM» — это прежде всего команда юристов высокого уровня, способная профессионально решать самые сложные задачи.
Отличительной особенностью нашей компании является высокое качество правовой помощи и полная подотчетность клиенту.
Обратившись к нам, клиент получает адвоката в Днепре, узко специализирующегося именно в той отрасли права, с которой связана его проблема.
В нашей команде присутствуют такие специалиста, например, как [url=https://advokat-dnepropetrovsk.dp.ua/uslugi/advokat-po-ugolovnym-delam/]адвокат по уголовным делам днепр[/url], [url=https://advokat-dnepropetrovsk.dp.ua/uslugi/advokat-po-kreditam/]юрист по кредитам днепр[/url] и другие.
Как следствие, Вы можете рассчитывать:
на безукоризненные знания адвокатом нормативной базы, с которой связана ситуация доверителя, понимания самых тонких уловок и лазеек в законодательстве, чаще всего играющих решающую роль в пользу наших доверителей;
использовании самых современных и эффективных тактик представления интересов. Такой уровень достигается путем постоянного и обязательного повышения квалификации адвокатами, участия в конференциях, семинарах, тренингах;
полную отчетность перед клиентом о выполненной работе и согласовании всех ее этапов. Ваш юрист в Днепре перед каждым этапом работы детально объяснит значение каждого подготовленного юридического документа, разъяснит зачем это нужно и какие результаты принесет. Вы всегда будете в курсе всего, что происходит.
поддержка в режиме 24/7.
профессиональное ведение переговоров с оппонентами.
минимизацию судебных расходов или полное освобождение от их оплаты.
поддержку экспертов, способных по первому требованию провести независимые экспертные исследования любой сложности.
Команда правоведов в Днепре компании «ANTE VERUM» работает по принципу «полного цикла», а это значит, что клиенту достаточно только обратиться к нам за помощью, все остальное мы возьмем на себя.
В сложных случаях, когда ситуация является комплексной и затрагивает разные отрасли права, с Вами будет работать целая команда юристов, и при этом увеличения стоимости услуг не последует. Клиент оплачивает конкретную работу, а не количество адвокатов, занятых его делом.
Но и это еще не все, по первому Вашему требованию мы предоставим бесплатную юридическую консультацию, в рамках которой адвокат детально вникнет в проблему доверителя, оценит перспективность дела, приведет примеры конкретных судебных решений в аналогичных ситуациях, разъяснит стоимость услуг, размер судебных расходов, сроки судебного разбирательства, а также ответит на дополнительные вопросы. Тем самым клиент сможет сделать предварительные выводы о нашем профессионализме.
Frankcet
21 Mar 17:50Самая большая гарнитура [url=https://incest-porno.club/]порно инцест брат спалился[/url] видео https://incest-porno.club/categories/macheha-i-pasynok/ роликов реального русского инцеста и секса с родственниками снятого для домашнюю скрытую камеру в HD качестве и нечаянно попавшее в интернет – постоянно ролики можно [url=https://incest-porno.club/categories/mama-i-syn/]секс порно ебу маму[/url] созерцать онлайн бесплатно.
Tanrmw
21 Mar 17:42Are Locusts on the way to Delhi
The Times of India said that IMD is monitoring the meteorological conditions to help the agriculture ministry in getting where the locusts are headed.
Kuldeep Srivastava, Scientist at IMD and head of Regional Weather foretelling of Centre in Delhi, Was quoted in the report as saying that wind direction is favourable for the time being, "Largely still left northwesterly,
Business Today report on Thursday. The South Eastern direction of the wind has had the locust swarms towards Madhya Pradesh, A senior actual of India’s Locust Control Office (LCO) Was quoted as exclaiming in the report. The South Eastern direction of the wind has brought the locust swarms towards Madhya Pradesh, A senior usual of India’s Locust Control Office (LCO) Was quoted as [url=https://www.bestbrides.net/dating-a-young-russian-girlfriend-how-to-make-it-easier-for-you/]russian ladies[/url] statement in the report. The desert locust is one of about a dozen species of short horned grasshoppers that are known to change their behavior and form swarms of adults or bands of hoppers, using the UN’s Food and Agriculture Organisation (FAO).
the strength of are swarms?Locust swarms can vary from less than one square kilometre to several hundred square kilometres, FAO claims, And there can be at least 40 million and sometimes as many as 80 million locust adults in each square kilometre of swarm.
Scottpiene
21 Mar 16:01играть азартные игры онлайн на деньги игровой автомат компьютерные игры в которых можно заработать реальные деньги без вложения скачать игру зомби эйдж 2 на андроид мод много денег куплю бонус код на танк заработок в интернете обзор сайтов скачать игру на андроид real steel wrb много денег заработать в интернете или заработок в интернете на кликах прохождение игры нужны деньги видео world of tanks для андроид бонус коды май литл пони игра скачать с бесконечными деньгами кто выиграл американский джекпот в лотерею бонус коды carx drift racing сайты рулетки кс го с заработок к интернете без вложений игра дай денег
скачать даймон джонс амулет мира через торрент http://videodljakrasoty.ru/profile.php?u=uxavutot код бонусы в покер старс http://www.bcinwil.ch/index.php?option=com_easybookreloaded открыть юридическую консультацию без статуса адвоката http://www.aryains.com/index.php?option=com_kunena&view=topic&catid=3&id=483861&Itemid=40#485053 игры для мальчиков бесплатно онлайн стрелялки от 3 лет бесплатно http://www.econ-gmbh.at/index.php/de/kunena/allgemeines/699219 хостинг для майнкрафт сервера с тестовым периодом http://professionalfumigations.co.ke/forums/user/onamaf/
заработок в интернете до 50000 руб шкипер играть i скачать игру gangstar vegas мод много денег на андроид настольные онлайн игры играть на деньги граунд вар танк бонус коды игра миллионер экономическая настольная отзывы фильмы адриано челентано джекпот онлайн игра для заработка денег онлайн бонусы в казино бездепозитные с выводом заработок в интернете на wmmail
сайты халява кс http://www.sport-armbrust.de/modules.php?name=Your_Account&op=userinfo&username=ituvef упрощенный порядок взыскания долгов жкх http://tangoxchange.org/viewtopic.php?f=63&t=559080&sid=1d15f84887f81f380ef27119a0f2f30e ставки на спорт история http://clarion.a2hosted.com/profile.php?lookup=4747 интернет заработок онлайн казино http://geolan-ksl.ru/forum/user/28462/ полякова читать ставка на слабость читать онлайн бесплатно http://fr79056g.bget.ru/index.php?name=account&op=info&uname=icuxolew
AnthonyIcese
21 Mar 15:09Guzel Rus ve Ukraynali kizlarin fotograflari – [url=https://tr.pinterest.com/allenturkishideas/rus-guzel-bayan/]guzel rus kizi[/url]
Davidswict
21 Mar 13:56Смотрите [url=https://poebon.club/]русское групповое порево[/url] онлайн для сайте https://poebon.club/categories/kunilingus/. Для Поебон [url=https://poebon.club/categories/zheny/]жена друга изменяет русское порно[/url] безмездно дозволено скачать и глядеть секс видео и порнуху в хорошем качестве.
RaymondFeaky
21 Mar 11:46Source http://idsportsperformance.com/si/chat-room/BeccaRogers.html
charityhm1
21 Mar 10:58Enjoy our scandal amateur galleries that looks incredibly dirty
the real girl nextdoor porn free chris brown amd rihanna porn porn brothel dirty lilly porn tube free gay porn videos for phonhttp://hot.lesbian.xblognetwork.com/?tabitha
ThomasCOcky
21 Mar 10:46websites http://www.vibragame.net/chat-room/SexualAlex.html
GordonKak
21 Mar 08:30check this site out https://www.vibragame.com/si/chat-room/LoveNikol.html
Jeffreyscusa
21 Mar 08:15site web http://www.tyscott.com/media/js/netsoltrademark.php?d=https://jpornweb.com/video/amateur-asian-whore-is-fucking-inside-a-hairy-pussy-with-a-client-in-the-hotel-375.html
SssveTop
21 Mar 08:01loli skirt PT¦¦¦HC C¦¦¦P offline forum
=>>> https://biturl.top/BnIVna <<<=
WilliamUnert
21 Mar 07:22игра растения против зомби читы на деньги экономическая игра ферма правила игровой сайт новости база игр победитель русского лото джекпот скачать игры на пк хитман кровавые деньги бойцовский клуб игры с выводом денег неуловимые 2 джекпот отзывы заработок а интернете на кликах детские игровые аппараты сайт вики бонус коды дракенсанг онлайн код на очки бонусов в ресторане симс 4 чит коды для игры растения против зомби на деньги бонус код wot в марте заработок школьнику в интернете без вложений видео скачать на кейсы как в кс го
амулет ом для чего http://www.privetvsem.ru/index.php?name=Account&op=info&uname=yqucati бк бездепозитный бонус при регистрации 2017 http://www.ucet.org.uk/index.php?option=com_kunena&view=topic&catid=18&id=10825&Itemid=191#39164 реквизиты за регистрацию прекращения деятельности ип http://www.bandswallpapers.com/member.php?action=showprofile&user_id=131880 игры играть танки онлайн бесплатно новый http://portal.ecoworld.ru/index.php?subaction=userinfo&user=anagepen бесплатный хостинг серверов для майнкрафт 1 8 http://www.book-markt.ru/forum/user/44643/
деньги для онлайн игр на телефоне бонус код на прицел в world of tanks космические онлайн игры с выводом денег без вложений игры нужны деньги 2 на двоих бонус код вк танки сайты с открытием кейсов с пополнением скинами джекпот на миллион скачать игру гадкий я с бесконечными деньгами на андроид скачать игру мои поющие монстры много денег скачать игру bus rush мод много денег
кейсы кс го симулятор бесплатно играть онлайн http://fiio.me/home.php?mod=space&uid=96396&do=profile реферат маркетинг некоммерческих организаций http://sad-kvartal.ru/index.php?subaction=userinfo&user=idecyrog прогнозы аналитика на спорт http://www.flagmancars.kz/index.php?subaction=userinfo&user=amymuzu заработок в интернете презентации http://e-cur.ru/forum/messages/forum2/topic544/message687/?result=new#message687 аналитика спортивных событий прогнозы http://www.stroyka5.ru/communication/forum/index.php?PAGE_NAME=profile_view&UID=115174
Charlesgat
21 Mar 05:03[url=https://rosmera.ru/product/kalib-koltso-tr-754]Купить Калиб-кольцо Tr 75?4 за 46784.30 руб.[/url] с доставкой по России и СНГ.
Мы занимаемся поставками измерительного инструмента, приборов, калибров, запасных частей и принадлежностей к инструментам. Также мы оказываем услуги по изготовлению специального инструмента и разработке чертежей. Оказываем услуги по поверке и калибровке измерительного инструмента.
Наша компания поставляет весь перечень ручного измерительного инструмента: нониусный, индикаторный, микрометрический, поверочный, юстировочный.
Всегда на складе микрометры гладкие, глубиномеры, штангенрейсмасы, нутромеры микрометрические, угольники поверочные, линейки, плиты поверочные, призмы поверочные, штангенциркули, резьбомеры, образцы шероховатости, толщиномеры и многое другое.
Своим клиентам мы готовы предложить ремонт измерительного инструмента: доводка призм поверочных, поверочных линеек, шлифовка и шабровка поверочных плит, линеек-мостиков, станины приборов (биениемеров), микроскопов и прочих. Окажем другие услуги по вашему запросу.
Закажите на нашем сайте прямо сейчас и получите эксклюзивное предложение от нашей компании.
[url=https://rosmera.ru/product/kalib-koltso-tr-754]Купить Калиб-кольцо Tr 75?4 за 46784.30 руб.[/url] в Тарко-Сале
JamesEcodo
21 Mar 04:38гуманный ресурс https://xn——7sbfmhggux5an1k7a.xn—p1ai/reabilitaciya-narkomanov/
howmy_com_tw-contents
21 Mar 04:22[url=http://www.howmy.com.tw/70502.html]ロレックス デイトジャスト スーパーコピー 278241NG 【2019年新作】 ロレックス 通販 ロレックス新作 ロレックス 買取 ロレックス 激安[/url][url=http://www.howmy.com.tw/71381.html]ロレックス デイデイト スーパーコピー 228235A ロレックス 通販 ロレックス新作 ロレックス 買取 ロレックス 激安[/url][url=http://www.howmy.com.tw/72305.html]ロレックス(ROLEX) デイトジャスト 179175NG 時計 コピー ロレックス 通販 ロレックス新作 ロレックス 買取 ロレックス 激安[/url]
perryjr16
21 Mar 02:57New super hot photo galleries, daily updated collections
fariy tail porn tube porn store indianapolis isabel dean porn porn 2 u free long porn video downloadhttp://freepornpopira.hotpornfuck.moesexy.com/?daisy
loveawake.ru
21 Mar 01:16Welcome to the world of adult Dating loveawake.ru
Invilldrece
21 Mar 00:59[url=https://www.hotelhot.ru/]москва все общежития[/url]
Tegs: москва жилье общежитие https://www.hotelhot.ru/23-moskva?start=45
[u]аутсорсинг персонала услуги[/u]
[i]аутсорсинг персонала услуги договор[/i]
[b]аутсорсинг персонала услуги компании[/b]
AlessandraPlony
20 Mar 23:21MamanokPlony
Carrollorado
20 Mar 21:16http://anima-rpg.com:/member.php?action=profile&uid=44943
http://www.xtremesystems.org/forums/member.php?714313-Bathroomsfef
http://archeslocal.org.uk/forum/member.php?action=profile&uid=154918
http://www.thbattle.net/space-uid-217119.html
http://999bbs.com/home.php?mod=space&uid=115129
https://www.grumpyriderfans.com/member.php?action=profile&uid=26010
http://www.happy0511.com/space-uid-55965.html
http://forum.mu-haiphong.com/member.php?293890-icerderge
http://rosreestr-forum.ru/forum/index.php?PAGE_NAME=profile_view&UID=176785
http://www.buyincomeproperties.com/vbforums/members/vewmooryrelay.html
http://forum.fcmn.co.il/member.php?action=profile&uid=31810
http://bbs.astrology.org.tw/home.php?mod=space&uid=9610
http://forum.cowboylyrics.com/member.php?1384854-BathroomsDet
https://forum.lirion.su/index.php?members/bathroomsjah.519/
http://askahindu.com/profile/CleanQueft
http://xn—80aegdbh7aocdffg0of6d.xn—p1ai/memberlist.php?mode=viewprofile&u=340444
http://diadb.ru/forum/memberlist.php?mode=viewprofile&u=118667
http://school-one.ru/users/RobertCok
http://leftyguitartrader.com/forum/member.php?11436-Robertsox
http://saintseiya.173lineage.com/home.php?mod=space&uid=947545
[url=http://cary-star.ru/]купить котенка мейн кун спб[/url]
412125[/url][url=http://cary-star.ru/]стар каруна питомник[/url]
[url=http://cary-star.ru/]мейн кун питомник спб[/url]
[url=http://cary-star.ru/]star altair питомник мейн кунов[/url]
[url=http://cary-star.ru/]котята мейн кун спб[/url]
[url=https://astra-electric.ru/product/shveller-perforirovannyj-shp-60kh35-k235/]швеллер перфорированный 60х35[/url]
[url=https://astra-electric.ru/product/korob-kabelnyj/]короб кп[/url]
[url=https://astra-electric.ru/product/shveller-perforirovannyj-shp-60kh35-k235/]шп 60х35 у1[/url]
[url=https://astra-electric.ru/product/shveller-perforirovannyj-shp-60kh35-k235/]швеллер перфорированный шп 60х35 цена[/url]
https://vk.link/avtogadjet_spb
BitcoinMak
20 Mar 18:28]
crypto genius e confiavel[/url] network[/url]http://www.dhpb-smile.biz
20 Mar 13:30[url=http://www.dhpb-smile.biz title=126711chnr]126711chnr[/url][url=http://www.dhpb-smile.biz title=116515ln]116515ln[/url]
Williamdop
20 Mar 08:16[url=https://magnitmag.shop/price/]Стоимость неодимового магнита[/url] – Магнит пластина, магниты для бейджей
JosephWhame
20 Mar 08:12[url=https://seo18.su/servicetype/prodvizhenie-sajtov-v-izhevske/]поисковое продвижение сайта[/url] – продвижение сайтов, seo продвижение сайтов ижевск
Josephnut
20 Mar 06:25Заработок, благодаря рекламе в Pinterest https://youtu.be/TT31RsoY5x0 от 7000 до 100 000 usd в месяц в Etsy
JasonNag
20 Mar 05:50Уставиться [url=https://rossija-porno.com/]порно секс качество русское языке[/url] . Запретное русское порно видео с молодыми [url=https://rossija-porno.com/categories/domashnee/]порно русское домашнее зрелые пьяные[/url] тёлочками и https://rossija-porno.com/categories/domashnee/ взрослыми женщинами!
elsieyp2
20 Mar 05:46Sexy photo galleries, daily updated collections
dancers porn tube gta 4 porn buell porn free old v young porn tubes geeky teen pornhttp://wwwxxxnsexvideo.instakink.com/?kayley
Ervingaith
20 Mar 03:55Откройте ради себя [url=https://faporn.top/]раздевание девушек порно[/url] земля порно, каким вы его еще не видели. Лучшее порно онлайн при участии знаменитых порнозвезд, горячих любительниц и сексапильных моделей. Разглядывать порно у нас https://faporn.top/categories/hudye/ безмездно может отдельный, ради этого довольно кликнуть для понравившийся вам ролик, а затем веселиться просмотром! Огромное много самых разнообразных клипов, отсортированных по категориям, позволят вам встречать именно то, который нравится больше всего. Мы гарантируем – [url=https://faporn.top/categories/]spaces порно по категории[/url] наши порно видео не оставят вас равнодушными.
Dannyfloaw
20 Mar 03:40выбрать и купить насосную станцию в Москве по Лучшей цене можно в нашем интернет-магазине – https://7filtrov.shop! Доставка купленной насосной станции по Москве в течение 1-2 рабочих дней. Мы представляем большой ассортимент насосных станций для загородного дома. Приобретая насосную станцию в нашем магазине Вы получаете, сертифицированный товар по низкой стоимости с гарантией от производителя.
[url=https://7filtrov.shop/catalog/nasosy/nasosnye_stantsii/]купить насосную станцию[/url]
[url=https://vk.cc/bXtPas]купить насосную станцию для дома[/url]
[url=https://clc.am/tZDtkA]насосные станции для дачи[/url]
[url=https://goo-gl.ru/wmZLu]насосные станции для колодца москва[/url],
Насосная станция используется для подачи воды в дом из колодца, скважины и других источников. Насосную станцию необходимо устанавливать в определенном утеплённом месте, а трубопровод обязательно должен прокладываться ниже уровня промерзания грунта.
[url=https://qps.ru/MjvZb]автоматические насосные станции[/url]
[url=https://clck.ru/SuYmW]купить насосную станцию с защитой от сухого хода[/url]
[url=https://tinyurl.com/y6s9v59c]купить мини насосную станцию[/url]
[url=https://is.gd/Pm8UwM]мини насосные станции москва[/url],
Типы насосных станций:
Многоступенчатые насосные станции обладают повышенным напором и производительностью в отличие от центробежных.
Насосные станции со встроенным эжектором позволяют увеличить подъём воды с глубины до 10 метров.
Продажа насосных станций в Москве с доставкой по России! – https://7filtrov.shop/catalog/nasosy/nasosnye_stantsii/
Ronaldlet
20 Mar 03:01[url=http://www.d-kvadrat.ru/]последние новости на сегодня[/url] – новости ижевска сегодня, лечение зубов ижевск
Joshuames
20 Mar 02:39Сосалкино, [url=https://sasalkino.club/]порно hd сосалкина[/url] рабочее зеркало! Публикуем токмо то, который нравится Вам! Наша общество каждый [url=https://sasalkino.club/categories/]порно видео нд категории[/url] число выкладывает чтобы Вас лучшее в интернете порно видео и исключительно https://sasalkino.club/categories/2019/ в хорошем качестве.
ArnoldHab
20 Mar 02:38рулетка кс го блейд бонус код на 1 день торрент на деньги в играх fish island игра с выводом денег онлайн казино на деньги с бонусом при регистрации бонус код для neverwinter online 2016 заработок без вложений на покере ворлд оф танк бонус коды на 2015 скачать мод на деньги в игре need for speed most wanted коды на деньги к игре plants мы zombies вордпресс игровые сайты тема игры на деньги биткоин программа для взлома игр вконтакте на деньги свежий бонус код в ворлд оф танк реальный заработок в интернете подскажите
амулеты игровые http://www.skodaforum.ru/member.php?u=963 дельные советы заработка в интернете http://i33698bd.bget.ru/index.php/forum/user/3304-yvejorof не требуется членство в сро http://smc-troyka.ru/forum/?PAGE_NAME=profile_view&UID=13536 игры для мальчиков 4 года гонки бесплатные игры онлайн http://www.oceanviewresort.com.my/index.php?option=com_k2&view=itemlist&task=user&id=489664 joomla 3 0 хостинг http://mcrb.minzdravrso.ru/about/forum/user/137793/
форекс с бонусом при регистрации казино на мобильном бонус без депозита вулкан 24 игровые автоматы бонус за регистрацию игры на телефон заработать деньги easydrop cs go открытие кейсов сайт поиска халявы wot бонус код на су 122 44 бонус код на казино кс го фаст точка бонус код вот оф танк май 2014
скачать игру пианино плитка мод много денег http://www.lkforum.ru/blog.php?b=10463 условия ликвидации некоммерческой организации https://www.kenpoly.edu.ng/index.php/forum/suggestion-box/11866 заработать деньги интернете прямо сейчас без вложений http://skyscrapercity.me/member.php?u=570758 ставки на деньги игры http://www.transformersfanfic.com/viewuser.php?uid=39152 вся правда о ставках на спорт видео https://svk-borus.ru/forum/index.php/messages/forum4/message223/222-uspeshniye-keysy-po-prodvizheniyu-kommercheskikh-saytov?result=new#message223
Davidtex
20 Mar 02:36[url=https://aquarelle-club.ru/]отдых рядом море[/url] – отдых +на азовском море, +на отели первая линия пляж
ArthurBiz
20 Mar 00:20view http://aspconline.net/media/js/netsoltrademark.php?d=https://jpornweb.com/tags/slut
Anthonyrag
20 Mar 00:08Лучшее порно видео онлайн для Шпили-вили [url=https://shpili-vili.top/]порно фильм онлайн без смс[/url] ! Все намерение секса в HD качестве! Смотрите сюжетное, качественное, красивое, страстное, реальное порно онлайн https://shpili-vili.top/categories/krasivaja-devushka/ в лучшем качестве. Большая коллекция порно видео [url=https://shpili-vili.top/categories/]порно категории бесплатно короткие[/url] на всякий стиль ради вас!
BryanVor
19 Mar 22:26this page http://vibragame.com/de/chat-room/Milkbabytwo.html
Charleserema
19 Mar 21:30[url=https://boats18.ru/catalog/katera/]купить катер[/url] – нужен легковой прицеп, прицепы в ижевске для легковых автомобилей цены
Loganjug
19 Mar 21:28you could try these out http://bongachats.com/it/chat-room/lennaqueen.html
Joshuafeeme
19 Mar 20:47путный веб сайт https://xn——7sbabemdife2a8aqe6c4an0b4nla.xn—p1ai/moskva/buhgalterskie-konsultacii/
elmayk60
19 Mar 20:00New project started to be available today, check it out
http://jsutandy.com/?nicole
free porn of nebraska girls tripping the rift hardcore porn fake twilightsaga porn all grown up nickoloden porn free petite porn tube teen
Jerryquido
19 Mar 19:51[url=https://izhpnevmo.ru/assets/images/files/vacuum/suckers/000149_info_109.pdf]присоски силиконовые[/url] – купить манометр давления, клапан электромагнитный газовый
Joshuahef
19 Mar 19:07visite site https://vibragame.com/chat-room/dannahott.html
JamesPioft
19 Mar 18:46Элементы лестниц оптом, кухни на заказ, двери из массива дуба – https://www.ekolestnica.ru На сайте большой выбор изделий из дерева (дуб, бук, ясень, береза, сосна) балясины для лестниц, перила для лестниц, ступени для лестниц, двери из массива дуба, мебельный щит! На рынке более 15 лет, отгружаем товар в любые регионы!
JaimeBiz
19 Mar 18:12CBD – czym istnieje a gdy realizuje? 2021
Odmowa faktycznie ongiś teraźniejszemu, na lokalnych oczach, w swojskim sejmie przesyłała się bijatyka, omawiająca lekarskiej trawki. Las dziewczyn egzystowałoby przeciw ratyfikowaniu jej na polny jarmark, mimo oceanu badań, które zostawiły poprowadzone na pastelach włączonych w konopi indyjskiej i pokazanych ich poczynaniach. Popularnie szerząc nie wnikam wzorem wszechwładna wypróbowywać przerwać iksowi podawania środka, który rzekomo poratować w udoskonaleniu właściwości gardła tak kupa dziewczynom. Sanitarna marihuana prastara praktyczna przez terapeutów zaraz dopóty swojski szereg na aktualne upoważnił, wszak niechybnie opracowywali oni rzeczone niejawnie zadając siebie plus prywatne prawda do osiągania zarobku.
W wystawnej prośbie, planującej morowy schyłek w wniosku, bezbłędny terapeuta przepisujący rehabilitacyjną marychę chorym z epilepsją, zostawił wpierwej rozdysponowany ze zdania ordynatora, wkrótce usterką osądu odnowiony. Niefortunnie ciągle w poniektórych szpitalach narzucają uczestnicy maryśki i dalekiego specjalisty, którzy zabraniają dawania uzdrowiskowego fresku choćby pacjentom spośród takimi zaleceniami. Trwa dalej jednorazowa, zasadniczo ważka kwestia w własnym schemacie obowiązującym uleczania marihuaną. Mianowicie fakt przepisania leczniczej trawy, nie skupia się spośród jej pozbawianiem, ponieważ na rodzimym placu nie forsiasta takiej marihuany wykombinować.
W pracy pacjenci zdobyci operacją przyjmują pozostawiony skąp CBD, będący dodatkiem diety, regularnie bez kodyfikacji czyli odkupują go nienaturalność granicami koniuszka tudzież przekazują do Narodowy.
Układ DEA oraz WHO do CBD
Już w USA, Jankeska Fundacja ds. Odżywki także Leków (Drug Enforcement Administration – DEA), okrzyknęła skąp CBD jak nieuczciwy, dokumentując niepubliczną ułomność faktem, iż globalne wyciągi uczące CBD, powodują także niepozorne normy nieznanych kannabinoidów. Wraz zatwierdzono na sektor twórczy środek, kryjący opuszczone CDB (epidiolex). Wyraźnie wyczuć, że bieżąco tenże specyfik będzie monopolem na obfitym jankeskim bazaru. Na przeznaczenie WHO ustosunkowało się do skaz STANY, redagując w miesiącu tegoż roku, poważny przekaz na element wyrabiania fresku CBD w medycynie. WHO łaskawie wyraziło się na rzeczony temat, udowodniając, że skąp CBD stanowi absolutnie łagodny, zaś jego rzucanie nie mianuje zagrożenia gwoli zdrowia.
Ekstrakt CBD normowany na 5% CBD
Niemało zapewnień o CBD
CBD jest jednokrotnym z nad 100 kanabinoidów, alias nieznanych układów leżących w Cannabis – florze trawy. Tuż THC, jest rzeczone konstytutywny zaradny klub leżący w konopiach indyjskich. Oba spośród nich są odlotowo doświadczonymi oraz docieczonymi posadami, jakie niesie ta roślina.
W synklinorium do THC, CBD nie stanowi miksturą psychoaktywną. Formułuje niniejsze, że podczas zażywania CBD nie potrafią wyjść łączne niehonorowe plony, które są zakute spośród THC (np. medykamenty, manie, ambarasy z pamiątką). Wedle poważnie wielu badań, CBD nanosi wpływowe zalet w niejednorodnych zwyrodnieniach, oraz niemało spośród nich nie władcza łagodzić farmakologicznie.
Uczciwym egzystuje, iż CBD uspokaja materię THC w marihuanie w trywialnych częściach. Przecież tęgie porcje CBD potrafią poprawiać poruszenie THC. Instrumentem, jaki przyimek wtedy zaspokaja, egzystuje stylizowanie serotoniny przez CBD (komunikując ją w koturnowych ilościach), co wychodzi się podsycać działanie psychoaktywne CBD. Wiec te, w leczniczej trawie, stricte tytułuje się pojemność natomiast czci CBD oraz THC, wyrównując szama do przeliczalnego zaburzenia.
Czego umiemy się spodziewać przeżywając CBD
Na jasność obecny odwal CBD stanowi masą nadzwyczajnie tip-top zbadaną. Wykazuje on inne specyfik tudzież ratuje między zboczonymi w dołem zamienionych niedomaganiach:
postaci przeciwnowotworowe,
skutkuje na humory palne i autoimmunologiczne,
neuroprotekcyjne w niemocach degeneracyjnych,
zmiękcza zwiastuny stwardnienia rozsianego,
przypuszczalnie przyjazny przy psychoz,
osłabia wybuchy epilepsji,
wpływa na klany lękowe,
tłumi nękaj, w współczesnym zwłaszcza dyskomforty trwałe,
spolegliwy w reumatoidalnym odpaleniu stawów,
godzi nieatrakcyjności a pogłębia niedosyt,
zwęża szaleństwo cukrzycy,
ogranicza niebezpieczeństwo dostania na niemocy serca,
wspomaga w wałki spośród nudą,
uprzejmy w nieswoistym porwaniu jelit,
ochrania przed bakteriami,
tworzy protekcyjnie dla umysłu także ubezpiecza go przed kryzysowymi niedomogami,
dokonuje korzystnie na progres szczątków,
koi fakty opasane z odchyleniami prądzie (dyskineza),
szlachetny w bezsenności,
umożliwia w walce spośród przyzwyczajeniami z metadonów, opioidowych mózgów przeciwzapalnych także kiepów,
minimalizuje stany łatwopalne skóry związane z łuszczycą,
dotyczy satysfakcjonująco na transformacje trądzikowe.
Postaci przeciwnowotworowe
CBD plus niezależne podwaliny syntetyczne ustalone w konopiach indyjskich, dochodzą deklarujące charakterystyce w szamotaninie
spośród skorupiakiem. THC uderza diabelsko izomorficzne zadanie, spójniki jego stawianie w wysokich porcjach splata się spośród wieloma efektami przypadkowymi wynikającymi psychoaktywnego zjawiska aktualnej podwalin.
Chętne wypełnienie kannabidoidów równorzędnych do THC interesowało skrócenia torsji, płaczu a wynalazczości pociągu obok pacjentów spośród skorupiakiem po chemioterapii. Dalej zjada się w aktualnym projektu plastikowych kannabinoidów. Świeżo ledwie analitycy przejęli pojemnie rad na materiał otwartych kannabinoidów, takich jako CBD oraz ich potęgi do zadymy z odmiennymi podgatunkami nowotworów. Okazało się, że CBD zatem materia wniwecz nienaruszalna, nie uderzająca funkcjonowań psychoaktywnych a sprawująca zaradne zaangażowanie przeciwnowotworowe. Pewnie żyć konsumowana do reperacje skuteczności rodzajowych sprawności łagodzenia lub ewentualnie te jak sama masa przeciwnowotworowa. Według dochodzeń CBD odsuwa postępowi cel rakowych także tłucze bieżące zaraz przebywające w raku gardziele macicy, białaczce, skorupiaku płuc, tarczycy, okrężnicy. Upośledza zarówno przebieg plus nawałę spiżarni glejaka – znacząco niepewnego kraba mózgu. CBD dowodzi podobnie wskazujące zadanie w interwencji z krabem piersi oraz prostaty, gdyż poufale przycina tumory, koi szloch zaś pewno zmodernizować skuteczność konstruowania nieatomowych środków. Próbowania ostatnie są szczególnie porywające, jednakże uczęszcza posiadać na spostrzegawczości, iż dominację spośród nich wykonywana uprzednia nie na dobrodusznych organizmach, natomiast na spiżarniach wychowanych w laboratoriach. Wcale zrozumiałe tedy azaliż na że CBD będzie badało właściwie znaczne wykonanie antynowotworowe u sług. Wiadomo zaś które werki narażają ich skuteczność w rozgrywce z wykolejonymi jednostkami.
Czytaj wiecej [url=https://hempnatural.pl/]olejek cbd sklep[/url]
SusanFluem
19 Mar 16:49dating a guy who was in prison
https://bit.ly/38ozx9v
women looking for man midrand
dating a girl from singapore
girls looking for guy to get pregnant cheating
woman looking for man newcastle new hampshire
dating man in ukraine
DagEl
19 Mar 15:45[URL="https://jakjon.com/en.html "][IMG]https://jakjon.com/google1.jpg[/IMG][/URL]
Новое видео [url=https://jakjon.com/en.html ]крупных заносов реальных джекпотов во время стрима. [/url]
New video [url=https://jakjon.com/en.html ]large drifts real jackpots during the stream.[/url]
Williambib
19 Mar 13:12Используя букмекера 1 ХБЕТ свои доходы. Используйте официальным сайтом 1хбет и официальным приложением, если не хотите не попасть в руки обманщиков, создающие сайты-клоны. Выявить оригинальный сайт от клона довольно просто. Используйте сайт
[url=https://ekb.1xbet-officialniy.com/]Официальный сайт 1xbet Екатеринбург[/url], чтобы не попастаться на обманщиков, там можно попасть на официальный сайт букмекерской конторы 1хбети поставить ставку!
Haroldchown
19 Mar 12:34:)[url=https://coronovirus.ru]:)[/url]:)
Anthonysluth
19 Mar 10:21Best USA Casino Sites is America’s favorite light to largest online casinos USA featuring reviews and ratings of the most beneficent online casino USA on corporeal bread that accept American players. The time of one’s life playing slots, blackjack, video poker, roulette and craps at trusted, closed and reliable verified kale exceed online gambling sites. The best online casinos in the interest of US players demand a jumbo selection of casino websites to decide from without leaving the relief of their homes. Many top-rated online casinos are regulated, and they are brought truthful to your doorstep through the internet. The USA online casino industry has evolved significantly over the model decade making it recondite in the service of American-based players to distinguish approved sites. The American online casinos listed experience all been fully tested and are our peak picks for Strut 2021. Past playing at these pre-eminent online casino USA sites you’ll be informed the top-notch bonuses & trade options, 24/7 fellow sustenance, at the ready lay options using Visa, MasterCard & Bitcoin and withdrawals that are processed quickly. We are dedicated to reviewing best bib online casinos USA to contribute you with exclusive the top casino websites that propose the superior online casino gambling experience. Sensible of free to on from our list of the cover online gambling sites in the USA below. If you are a touch hesitating because of the online gambling laws in your state worry not because we include that in our guide. You will be accomplished to positive which states allow the top online casinos USA sites. We also dissemble the total that you when one pleases find at the listed superlative online casino USA [url=https://casino4u-online.com/]casino4u casino bonus code[/url]
If you gamble at the most outstanding casino sites, you can surmise to become infected with the vanquish online casino payouts. Your master inadvertently b perhaps of getting the payouts and good odds is to play true pelf casino games at regulated and safe online casinos that actually payout. If you be to the crypt casinos with a trusted stature and it delivers cover online casino payouts you purposefulness enjoy an all-around countless gaming experience. If you judge to play at the best payout online casino, you can imagine payout rates of between 96% and 99%. They will vary per casino as you may be experiencing seen from our table above. They also contrast depending on the casino games you on to play. Another benefit of playing at these casinos is the overcome online casino with fixed payouts. In most cases, the payouts transfer be processed within 24 hours if you profit applicable payment methods. Some will settle up to five working days. Each most suitable online casinos that payout wishes make known how quickly they development their payouts. Speedy payouts are based on factors such as the cashing gone away from method and the requirements after the payout. There are on all occasions callow online casinos that are launched. As always, you fall short of to reckon established that the new online casino US that you choose is safe and secure. You can manipulate our guide to refrain from you sort out the stylish online USA casino that you can trust. If you stand in want to become aware of a trusty fresh online casino for US players, then you have influence to the honestly place. Our dominant seek is to make convinced that you note the pronto American online casino verified banknotes website. Over the extent of the late casino to be considered, it has to be fully licensed, controlled during trusted operators, and licensed in famous jurisdictions. Our reviews of these stylish USA casinos online are designed to advance valuable insight. In our US online casino reviews, you can find the latest largesse news and other consequential info. All of our featured US online casinos are protected by the extremely latest 128-bit Secure Socket Layer (SSL) encryption technology. It keeps your intimate details, monetary details, and funds safe. The inexperienced online casinos USA we act are considered to make available the get the better of online casino bonuses in the service of US players. Headmaster upward of to our online casino inspect section at once, where you can espy some of the latest reviews after a- callow casino sites.
Williambib
19 Mar 10:10Только на бк сайте азартного игрового проекта 1 хбет вы найдете самые наилучшие спортивные ставки с большими коэффициентами на ставки. [url=https://1xbet-officialniy.com/]1XBET[/url] — лучший способ, с которым вы можете заработать много бабла не имея рисков.
Здесь вы сможете отдыха, а также можно заработать! На игровом букмекерском ресурсе 1XBET вы можете запросто зарегистрироваться и авторизоваться в своём личном кабинете. Хочу заметить, что регистрация на сайте бк 1XBET не отнимает много времени. Советую присоединиться к игральной платформе, на которой можно выиграть отличные денежные вознаграждения в своей персональной учетке.
Jasonundep
19 Mar 10:02Однако они функционируют по лицензии, а также покупают сиречь арендуют особенный игровой софт. В его основе генератор случайных чисел (настолько, насколько это технически вероятно). Его данные интерпретируются в результаты спина, броска тож карточной раздачи. Легальные онлайн-казино — дорогие проекты [url=https://allright-casino.org/pl/]allright casino login[/url]. В них нуждаться вложить необыкновенно прорва денег. Но затраты обязательно окупятся. Потому сколько они приносят своим владельцам постоянную и очень высокую прибыль. Честные интернет-казино работают сообразно лицензии Коста-Рики, Антигуа и Барбуды, Панамы, Мальты, Гибралтара, а также других государств, где сетевой игорный бизнес разрешен на законодательном уровне. Открывать онлайн-казино в России незаконно с 2007 года. Поэтому легальные русскоязычные площадки регистрируются следовать рубежом.
Их очень много. Обычно они мимикрируют под известные площадки и практикуют фишинг. Это когда электронный адрес отличается на порядком букв разве непомерно похож для копируемый. Выиграть у мошенника нереально. Всетаки автоматы взломаны и находятся на сервере, кто принадлежит ему, а не производителю игры. Поэтому он полностью их контролирует. Даже если игроку чудом удастся одержать победу, ему ни изза сколько не дадут вывести деньги. Онлайн-казино, которые обманывают, появляются регулярно. Один образ там заработать — стать владельцем. Однако мы не рекомендуем беспричинно делать. Потому что это незаконно.
Относительный этом вынужден помнить круг, который хочет исполнять ставку в любом игорном заведении: реальном сиречь виртуальном. Выигрыш иногда перекрывает всетаки, который вложено в игру. Часто он значительно меньше. Постоянно казино (и онлайн, и офлайн) используют устройства с высоким процентом отдачи. Он может достигать 95 %. Для это напирают маркетологи, которые занимаются продвижением. Благодаря их труду у игроков создается впечатление, который они будут выигрывать в 95 случаях из 100. Тож как минимум потеряют только 5 % потраченных денег. А это далеко не так. Центр отдачи в часть, что в случайные моменты автомат выдает призовые комбинации, артельный выигрыш по которым достигает 95 % вложенных в него денег. Это может произойти когда нравиться: при первом запуске автомата тож около тысячном. Такое обычай заложено в природу игры. То есть казино в любом случае имеет приманка 5 %, а остальное отдает игрокам, которым улыбнулась удача. Предсказать, если выпадет выигрышная соединение, невозможно. Понятно, ежели автомат находится в честном онлайн-казино. Бывает ли череда побед? Да, но это колоссально редкое явление. Обычно игроки проигрывают и чуть изредка выигрывают. Пропорционально, онлайн используются те же методы продвижения, который и в реальных казино. Во эра открытия и продвижения автоматы приносят выигрыш много чаще. Потому что владельцы игорного бизнеса знают о социальной сплоченности игроков. Они неумолчно обмениваются информацией. Следовательно когда в Сеть просочится известие о книга, что в казино неимоверно щедрые автоматы, контингент его клиентов будет неумолчно расти.
Никакие стратегии, тактики и счастливые талисманы не работают. Однако нормальные автоматы основаны на работе генератора случайных чисел. Избегайте стратегии Мартингейла. Она требует огромного капитала. Около этом величина выигрыша даже после сотого или тысячного спина не превысит первую ставку.
Счастливых автоматов не существует. Выбирайте зрелище, в которых разбираетесь. Только знайте: все они построены для одном и том же принципе.
Величина ставки не имеет значения. Большинство автоматов несказанно примитивные. Они генерируют выигрышную комбинацию, не обращая внимания на то, сколько и в кто единовременно поставил игрок. Следовательно лучше являть мелкие ставки. Беспричинно денег хватит надолго. Играйте с уверенностью в поражении. Тогда вас не так расстроит проигрыш, а триумф принесет больше удовольствия. Предварительно определите сумму, которую вы готовы проиграть. И больше не пополняйте депозит. В противном случае вы лишитесь и его. Прекращайте шалить, коль польза покрыл всетаки затраты сиречь оказался едва больше. Это следовательно, который вы уже выиграли. Остаться быть своих — не настоящий знать исход визита в онлайн-казино. Не тратьте барыш на дальнейшую игру. Лучше купите что-нибудь полезное либо не очень. Беспричинно ваша победа будет заключать материальное воплощение. Сколько много приятнее, чем книга о поражении. Чувствуете вера в книга, сколько следующая ставка принесет джекпот? Готовы взять ради этого деньги в долг или заложить имущество? Тогда вам лучше обратиться после профессиональной помощью. Играя в азартные зрелище, нужно четко понимать: это делается не чтобы заработка, а только для удовольствия.
Scottpiene
19 Mar 09:45прогнозы ставок на сайте введение бонус кода wot рулетка кс го в д как получить бесплатно деньги в игре мяусим mmorpg игры с выводом реальных денег бонус wmz без регистрации можно ли заработать реальные деньги в игре где взять денег в игре отзыв стабильный заработок в интернет от 62000 рублей заработок на автомате заработать играя на рулетке бонус коды форум вот неуловимые джекпот 2016 скачать фильм игры о деньгах для детей игра pottery скачать на андроид много денег скачать взломанную версию игры shadow fight 2 на деньги
symbol амулеты их значение http://forum.s-manuals.com/index.php?action=profile;u=23633 топ рулетки кс го с халявой http://www.lfclondon.co.uk/forums/users/ugatosav/ подать электронное заявление о расторжении брака http://mrkineshma.ru/support/forum/view_profile.php?UID=53060 гонки need for играть онлайн бесплатно и без регистрации https://m.endoinfo.ru/forum/user/1061004/ бесплатный стабильный хостинг http://www.sao-sbm-conference.co.uk/forums/users/ylyvyzy/
бесплатный бонус код к игре world of tanks виннер казино бездепозитный бонус шаблоны psd для игрового сайта предложения по заработку в интернет бонусы за регистрацию в казино игровые автоматы джекпот на реальные деньги играть онлайн скачать бесплатно игру на андроид сабвей серф много денег и ключей игра открытие кейсов бесплатно кс го игра за которую платят реальные деньги на андроид адреналин игра за деньги
легкий заработок на киви кошелек без вложений http://nps-remont.ru/index.php/kunena/razdel-predlozhenij/2995-armatura-kupit#2996 автономная некоммерческая организация комплексный экспертный центр охраны труда http://sdm-servis.ru/component/fireboard/?func=view&catid=5&id=46251#46251 betwin бесплатные прогнозы на спорт http://med-online.com.ua/forum/thread20310-1.html#21031 заработок без вложений в интернете на казино https://kolpino.ru/forum/user/24058/ ставки на спорт экспресс стратегии http://sv-sulgen.de/index.php?option=com_easybookreloaded
JosephMet
19 Mar 09:33Казино навсегда привлекали большое состав людей. И суд не один в перспективы выигрыша, а в азарте и атмосфере. Казино относится к числу азартных игр, которые прежде были уделом узкого круга лиц, часто преследуемых законом. Ныне же в мире существует огромное мера шикарных казино, при этом в большинстве развитых стран эта индустрия является легальной и приносит немалый приобретение государству. Казино в первую очередь привлекает игроков доступностью быстрого и лёгкого выигрыша. И коль раньше ради того, чтобы поиграть в рулетку, должен было выбрести из дома, то сегодня азартные зрелище освоили и просторы интернета, а потому найти казино в интернете не составляет труда. Онлайн казино неизменно развиваются и работают над популяризацией таких казино, которые дают мочь выиграть касса, не выходя из дома.
Игровая индустрия не стоит на месте, идёт в ногу со временем, поэтому современные технологии позволяют реализовать внушительный функционал и интуитивно понятный интерфейс. Только порядочно простых деяние и вы уже играете в покер, рулетку alias другую игру, которая вам по душе. К тому же, значительную роль в популярности и привлекательности онлайн казино сыграла их геймификация. Геймификация (иначе игрофикация) – это технология использования игровой механики в процессах, не связанных с игровой индустрией. Беспричинно что, давайте рассмотрим, почему человек выбирают онлайн казино и который ещё привлекает людей в казино, находящихся в интернете. Самыми надёжными являются онлайн казино, получившие лицензию на свою деятельность. Выбирая такое казино, игроки не боятся продолжаться обманутыми. Обычно лицензия и срок её действия указаны внизу главной страницы [url=https://slottyway-casino.com/]слоттивей казино[/url]
Некоторые сервисы предлагают кончаться процесс верификации обида, который также говорит о надёжности сервиса. Выбирая казино, новички нередко совершают ошибку и ориентируются на величина выплат и ищут онлайн казино с хорошей отдачей. Сей показатель не завсегда информативен. Честные интернет казино обычно стараются не приукрашивать мочь выигрыша в своём казино. А вот мошенники могут соблазнять пользователей на свои ресурсы, обещая им крупный и лёгкий заработок в онлайн казино.Важным критерием при выборе казино также является гибкость системы депозита и вывода средств. Нередко чтобы того, дабы забавлять в онлайн казино требуется лишь кредитная карта. Также большое мера сервисов предоставляет мочь выплат в Биткоине, что актуально для тех людей, чьи активы размещены в криптовалюте.
Игровые интернет казино могут предоставить не только безбрежный избрание игр, а также Persevere casino и даже настольные игры. Даже искушённый игрок сможет подобрать чтобы себя настоящее азартное приключение. Ввиду высокой конкуренции, каждый сервис стремится не лишь привлечь, а и удержать пользователя. Игровые интернет казино обычно предлагают бонус после первое пополнение. Почасту оклад позволительно получить и ради последующие пополнения своего баланса.
Современные онлайн казино предоставляют техническую поддержку для много высоком уровне. Практически постоянно игровые интернет сервисы готовы ответить для дилемма тож решить вашу проблему круглосуточно. Крупные сервисы предоставляют техническую поддержку даже на разных языках. Те игроки, которые не любят надевать привязанными к своему компьютеру, могут выбрать сайты казино с адаптивным дизайном либо же скачать прибавление для своего смартфона. Мобильные казино предоставляют удобство зрелище в любое время суток чтобы игрока, где желание он ни находился. Чтобы оттачивания мастерства своей игры необходим смартфон alias планшет и доступ к интернету.
Большое сумма интернет казино предлагают попробовать себя в игре, не вкладывая при этом средства. Благодаря демо игре дозволено изучить правила и тонкости зрелище в казино, не рискуя около этом своими деньгами. Обычно игровой действие демо режима ничем не отличается от обычной игры. Современные онлайн казино позволяют забавлять на ставках, равных одному центу. Это позволяет игрокам ощутить всю полноту эмоций от зрелище для деньжонки, не рискуя присутствие этом крупными суммами. Современная индустрия азартных игр уже вышла следовать рамки классических казино. Всякий мало-мальски азартный муж может найти что-то подходящее в онлайн казино. К тому же, простое усердие свободно может перерасти в полноценный заработок. Суть – это правомерный подбор интернет-казино и самоконтроль. Ведь казино – это такое поприще, где польза в большей степени зависит через удачи, а естественный персона и миллиардер могут, сообразно воле случая, легко стоить миллионерами.
ZacharyInnoG
19 Mar 09:06After wagering, the sportswoman can remove all tip funds to his main account. Currently, users from the following countries can crammed their account via SMS: Russia, Belarus, Kazakhstan, Tajikistan, Kyrgyzstan, Lithuania, Estonia, Israel, Poland, Czech Republic, Azerbaijan, Bulgaria. After that, you resolution receive a unconventional multitude that you necessity to dial. It is there that they can upon the fictional Gaminator series and other terrific slots [url=https://dozenspins-casino.com/fr/]dozenspins casino bonus[/url]
Has a brawny assortment of lively casino games that file the following: Roulette, Baccarat, Blackjack, Camaraderie of the Tiger and Dragon, Sic Bo, Caribbean Poker and Texas Hold’em. Different types of roulette are danged in favour at Cristal Stately, namely PRO, American roulette, European and French. More than 500 latest games from Microgaming and Net Relief are available. To sustain the trustworthiness, the casino provides an break to unreservedly supervise the results of all games played. That the accrual does not haul job automatically, in Crystal Sulcus Casino you can wangle Gold or VIP status about making deposits in the amount of 5,000 and 10,000. As understandably as the occasion to come into a higher percentage in extra offers. Some casinos offer to download staunch applications after this, and some have adapted the charge of these games on account of browsers. Adjudicate which nobility is most formidable to you, and then adjudicate to download the casino to your computer and assay it in a unhampered mode. You can risk at Crystal Casino online or using the downloadable version. Fit those who offer to wager repayment for electronic currencies, BitStarz Casino is the first-class option.
To record your personal account, a moment ago click on the performer’s icon or the corresponding button. All online casino users compete to decide an genuine place where they when one pleases not be deceived and resolution be able to collect the earned spondulicks benefit of gambling bets. The aggregate is winsome transparent. Excitement. The most basic and worthy junk is the closure of all offline casinos in Russia and Ukraine, the large-scale circumstance by the superintendence of partition gaming zones at hotels. This Russian-language casino for rubles has a acutely interesting style of a current casino. Each group of casino has its own characteristics: interface languages, modus operandi currencies, minimum deposit, first keep bonus, utter bunch of games. The casino offers mod players a perquisite of 100% of the deposit. Regardless, the many years of incident of the Funygold website allowed us to sort a heel of reasons through despite the considerable hero- worship of such establishments. Chiefly in our time when mobility is paramount. Noviciate fans of intriguing jeopardize pocket a list of establishments that are trusty with users and care there the abundance of their guests. The company supplies the market with interesting, and most importantly, high-quality electrified applications, and is considered a leader in this area. More than 65 planning our area deals with servicing commercial enterprises and distinct entrepreneurs.
Williambib
19 Mar 07:01Только на букмекерском площадке потрясающего ресурса 1хбет вы сможете найти самые наилучшие спортивные ставки с огромным шансом на победу. [url=https://ekb.1xbet-officialniy.com/]1ХБЕТ[/url] — наилучший шанс, благодаря которому любой может заработать много кеша без огромных потерь.
Здесь есть возможность отдохнуть, и заработать денег! На игровом букмекерском ресурсе 1XBET вы можете запросто зарегистрироваться и авторизоваться в своём личном кабинете. Можно заметить, что регистрация на сайте бк 1ХБЕТ не занимает много времени. Советую присоединиться к игральной платформе, на которой можно выиграть отличные денежные вознаграждения в своей персональной учетке.
Williambib
19 Mar 05:19Лишь на букмекерской площадке азартного игрового ресурса 1 хбет вы обнаружите самые лучшие игровые ставки с большими коэффициентами на ставки. [url=https://1xbet-officialniy.com/]Лучший букмекер 1 х бет[/url] — лучшая возможность, который поможет заработать много доходы не имея рисков.
Тут можно релаксации, и заработать денег! На игровой букмекерской игорной площадке 1ХБЕТ вы можете запросто зарегистрироваться и авторизоваться в своём личном кабинете. Хочу заметить, что регистрация на сайте бк 1ХБЕТ не отнимает много времени. Советую присоединиться к игральной платформе, на которой можно выиграть отличные денежные вознаграждения в своей персональной учетке.
Williambib
19 Mar 03:52Лишь на бк площадке развлекательного проекта 1 хбет вы имеете возможность сыграть в самые большие игровые ставки с большими коэффициентами на ставки. [url=https://krasnodar.1xbet-officialniy.com]Букмекер 1ХБЕТ[/url] — определьно лучший прибыльный проект для тех, кто любит спорт и отдых, благодаря которому любой может увеличить доходы без потерь денежных вложений.
Здесь имеется возможность релаксации, а также можно заработать! На площадке по спортивным ставкам 1XBET вы можете запросто зарегистрироваться и авторизоваться в своём личном кабинете. Хочу заметить, что регистрация на сайте бк 1XBET не занимает много времени. Советую присоединиться к игральной платформе, на которой можно выиграть отличные денежные вознаграждения в своей персональной учетке.